Thursday, April 7, 2016

Floor refinishing, the edger

So, once we got done with the 36 grit at a diagonal and then 36 straight with the drum sander, it was time to move on to other grits. But the thing about drum sanders, and part of the reason we decided to go with an orbital is that the drum sander can't get close to the walls or in tight spaces (orbitals can). So you and entirely different piece of equipment called an edger to get in the tight spaces. Now, what we didn't know is that "edger" is code for "torture device". They look sort of innocuous, kind of like a shiny, spaceship on wheels

The thing is, they weigh, like 50 lbs. Or maybe not 50, but a lot. And you aren't supposed to press down on them, and they are only about 2 ft off the ground, so what you end up with is a hunched over process where you are trying to keep the thing moving while balancing precariously. I tried it, Matt tried it, it was hard, really hard. And with 36 grit, you can really mess up the floor because the disc spins in one direction and you can "dish out" the floor in a circular pattern. Especially if you are moving against the grain, which inevitably you have to do in the places where the floor butts into the wall (as opposed to the places where the boards go along the wall). But, then Jimmy to the rescue. And let me tell you, he was awesome at it. our book recommended a J patter where you use the edger to go with the grain as far as possible and then turn at the last possible second next to the wall at the butt ends. Dad was a real trooper because he basically did 80-90% of the edging. And with 100 square feet, three bedrooms, 5 closets, a living room, and a dining room, that's a lot of edging.

After that, all that was left was the very extremes of the corners, which you get to either with a hand held scraper or a triangular sandpaper head for a multi tool (we used both, and they each had advantages). Scrapers are basically hand held razor blades that you, yes, scrap against the floor. The advantage is that you can really feel what you are doing and easily control the blade. But it's hard word. The one we got looked basically like this:


You basically put one hand on the handle, and one hand on the knob, and the angle and pressure control how much you take off.
The triangular sander on the other hand, makes short work of anything, but its really easy to go too far and take off too much (or at least that's what Mom said because honestly, she did all of the work with the multi-tool) Do I have amazing parents? Yes, absolutely.


Wednesday, April 6, 2016

Floor refinishing, the big boy part 1

So, having admitted defeat with the orbital, we pulled on our big boy pants and went to get a big boy tool. We tried to do some research on different types and brands, but honestly, there isn't much out there. So, in the face of no information we decided to go with what we did know. There's a new Menards in town, and they rent drum sanders, and those drums sanders are pretty new, because the store is pretty new. So we decided we'd do that.

Turns out, the drum sander isn't so scary. One website we went to recommended you use the lightest grit you can find to practice. In our case this was 80 grit and this seemed like good advice, so that's what we did. When using the drum sander the MOST important thing is to ALWAYS keep it moving when it is running and touching the floor. Now the great thing is that most new machines come with a clutch that allows you to raise and lower the drum after you get it started. The trick is to start moving forward (or backward) before lowering the clutch. After the first few tries with the 80, we got the hang of it pretty well. So, we switched to 36 and started going for it.

We decided to start in the master bedroom

And we got as far in 30 minutes as we did in 7 hours with the orbital.


It sort of looks like Matt is doing a happy dance in the photo. I'm not sure if he was or not, but for the sake of the story, I'm going to say he was :).

Now, using the drum sander has a very specific formula. First of all, one pass is forward AND backwards. It's actually almost easier to walk backwards and pull it behind you. Also, you need to overlap passes, so that each bit of the floor gets actually 4 passes ( 1 forward and back, and then an overlap, forward and back). We actually put a piece of tape on the front of the drum and drew a line on it, so that we'd know where the center was. In addition to that, if your floor is very bad, like ours was, you will want to take at least one pass at a 7-25 degree angle to the floor boards. Because an angle cut is more aggressive than along the grain, this helps level the floor. If your floors aren't crazy bad, you might be able to get away with doing the diagonal at 60 grit, but with our cupped boards and old varnish, we weren't so lucky. But a diagonal at 36 did the trick (actually, in a few places, we had to do more than one diagonal pass at 36), but the point with 36 grit is to get all the varnish off. 

With the big boy, it only took a day for us to get all the varnish off, even with the extra diagonal passes. Also, pro tip here, if you do a diagonal pass with a grit, you must go over it with the grain with the same grit. A lot of people will skip this step, thinking the next grit will take out the cross grain scratches, but in general, it won't. And honestly, with the drum sander, it doesn't take that long ot do it right. 


Floor refinishing, our tryst with the multi head orbital

Sounds dirtier than it is, I promise.

Now, if you are going to refinish a floor, the most obvious part of the process is that you have to get the old finish up (closely tied for "most obvious" with needing to put down new stain"). In the olden days, there was really only one way to do this, a drum sander. But drum sanders have a fairly scary reputation (more on this later). So, for the do it yourselfer, a few years ago there emerged another, safe option:the multi-disc orbital. And after much reading, and researching, we decided this was the way to go, because pretty much everything we read said it was practically foolproof. So, we found a recommended brand, and a place that carried them, and one Saturday morning a few weeks ago, we went and picked on up our very own, which looked like this:


now if you were to tip that puppy back, you'd see that it has four round discs on the bottom. This discs spin around, but the also oscillate in a random pattern so that the scratches don't all appear in the same direction. This is in contrast to the drum sander above, which only sands in line with the direction of the drum. Because of the random oscillation, you kinda can't mess it up. And if it sits in the same place on the floor, well, that't not a problem either. So all signs pointed to this being the machine for us. 

Unfortunately, the place we rented from was pretty busy and the guy that helped us was, and I quote, "not a floor guy" so they were pretty sparse with the help. No manual, no nothing and we had to ask for help. I would not recommend them. But, the machine was supposed to be foolproof, so we went ahead. We bought a ton of packs of round disc paper, lugged the thing home and up the stairs, and decided the back bedroom was the best place to start. 

We have the requisite before picture:

And a during, Matt's sort of buried in the closed here but you can see the pattern we started with:

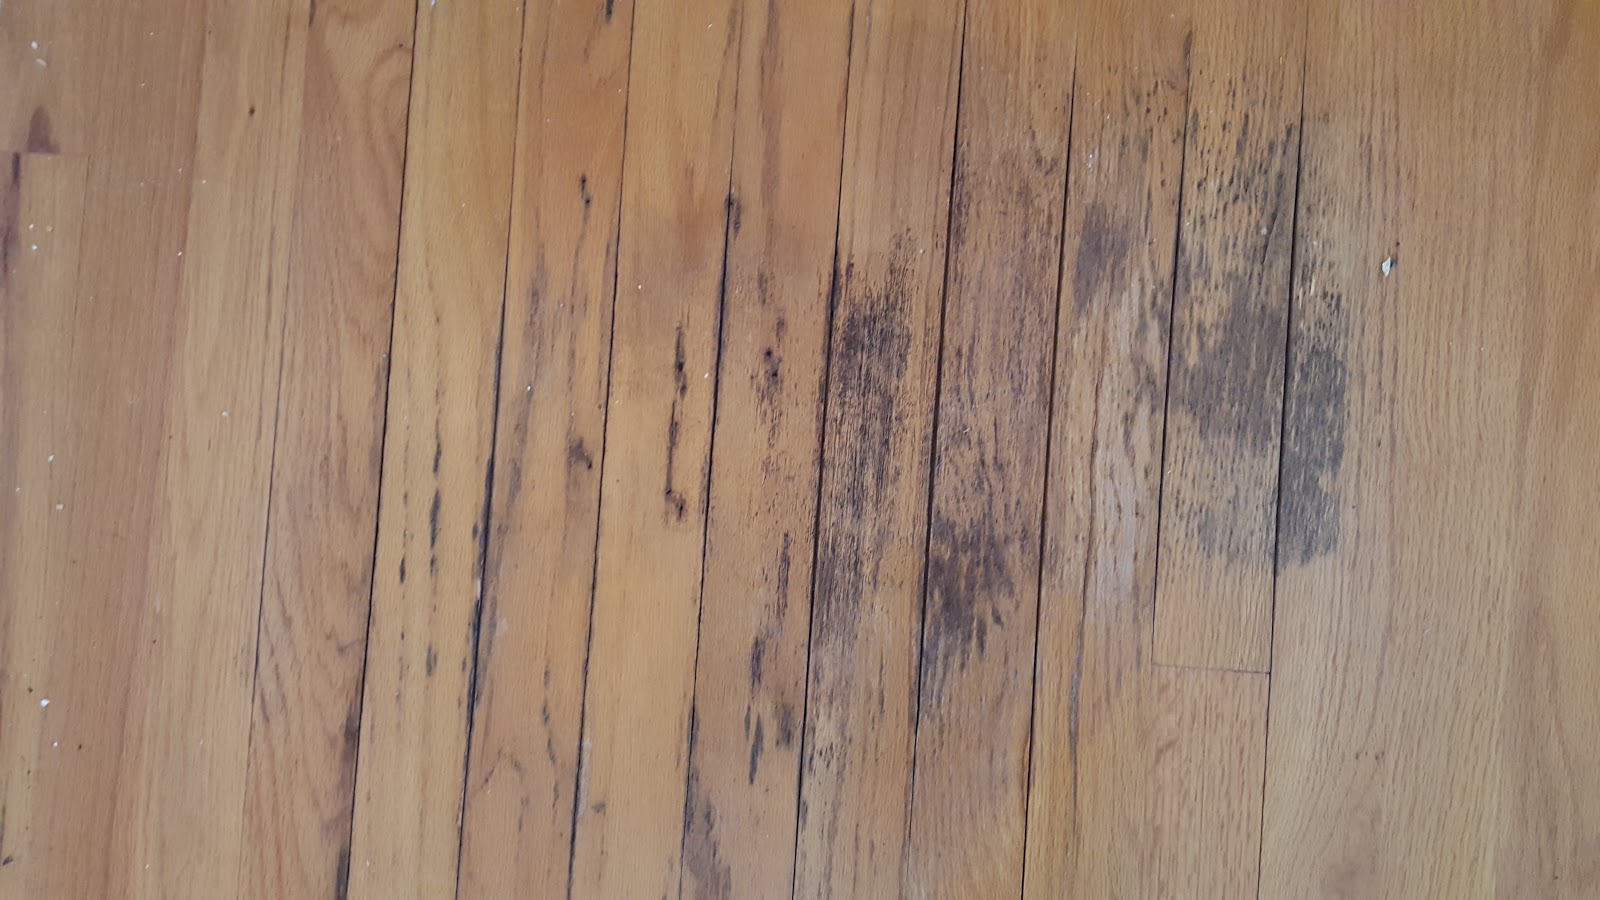
And after 7 hours of hard work, we were here, sigh:


As you can see from the variegated color still on the floor, we didn't get all the old varnish off. We read in the books that if your floor is in good shape, you can start with 60 grit. We figured, our floors weren't amazing, so we started with 40. And that got us about a 3x6 ft square using one set of pads. So, we changed the pads a bunch, and kept going, because at that point what did we have to lose? But after a lot of time, we basically had to admit defeat. Not only did we not buy nearly enough pads to do the rest of the house, but it would have taken us about two weeks to finish it up, and at more than a dollar per sandpaper pad, and four pads on the machine at a time, it would have cost a fortune. 

But, we did learn a lot. First of all, the machine is foolproof. And very easy to use. You basically just turn in on and it does all the work. Secondly, our floor wasn't in sort of bad shape. It was in BAD shape. You can't really see from the pictures, but we had some major issues with cupping of the floorboards. Cupping (and crowing) occurs when the moisture content above and below the floorboards is different. You can see it really easily in water damaged spots, but we had it all over our floor. Probably because our lower level is a basement. In any case, cupping is when the middle of a board is lower than the edges (crowning is the opposite, where the edges turn down). All of this meant that the random orbital, because it was flat and not very aggressive, couldn't get at the places that were lower. 

Long story short, if your floor is not absolutely flat, you don't want the easy way out. You need the big boy sander. Which is what we did the next weekend. 

Floor refinishing, wood bleach

I think it's safe to say we did not know what we were really getting ourselves into. Then again, we rarely do. A month seemed like enough time. Professionals can do it in 5 days, so a month seemed like a pretty good buffer. That said, we got so close, oh so close, but we had to call in some help at the end. Ah well, can't win them all.

Lets see, when we left off last, we were talking about flooring and replacing boards. Which we did in multiple places, most notably in the corner of the living room.


Now, because this is (obviously) a lot of work, we thought we would try a different approach on some of the spots that seemed less terrible. For example, this one in the middle of the living room:


Now, I now it doesn't look like much, but this is after at least one round of sanding down to bare wood, so believe me, when you put poly back over it, it would be noticeable. Since this one, like the one above, spanned a number of boards, we though we'd try using wood bleach to even the tone. We read about it online, and it seemed like a good idea. Unfortunately we neglected to read the fine print on the bottle that said it had to sit over night and more than one application might be necessary. By this point, we were riding pretty close to our deadline for applying poly, but we thought we'd give it a go anyway. here's a shot of the application:


And the after:


As you can see, it did lightened the boards some, but just not enough to really make us feel confident that you wouldn't be able to see it in the final product. So, being the perfectionist we are, we decided to pull up all those boards and replace them. There just wasn't time to keep trying. But hey, you win some, you lose some. 

A word of advice for the future. After much research online, it seems that black stains are generally caused by pet urine and are EXTREMELY hard to get out, even with wood bleach. The urea in the urine reacts with the tannin in the wood (fun fact, in the old days this was part of the process used to tan hides). The long and short of it is that if you have damaged boards that are white in color, it will probably sand out, but if its black, you will probably have to replace them. Our boards were definitely that way, and its good we didn't try to sand it out because after we took them out you could see the depth of the stain into the board, and it was a good 1/8 inch. Way too much to sand out.