Thursday, February 21, 2013

bit by bit

Little by little, as we inch closer to the wedding we are getting closer to getting the arch done.

While I did some more cleaning and filled out the info for the photographer, Matt worked on the other top slats.

Cutting:

Sanding:


And some test assembly!


I'm really pleased with how its turning out and Matt has done an awesome job making it look pretty without the benefit of exactly the right tools. 
 
We still haven't quite figured out how the top will go, but we'll figure that out Sunday after we get back from our bachelor/bachelorette parties!!!


Wednesday, February 20, 2013

The arch continues

Tonight I spent some time getting the house in order and Matt worked on taking the top of the arch from square blah:


To awesome:


Now, to figure out our original design, we had to break out some trig, mostly to figure out what angle matt should set the mitre saw at:


We ended up going with something slightly different, which involved an easier 45 degree angle, but still, gotta love that mental exercise. SOHCAHTOA anyone?

Saturday, February 16, 2013

More arch!

Matt and I had a very busy day today. We met with the DJ this morning, spent a lovely afternoon in Stoughton looking at antiques, and then met with the cake lady in the afternoon. And continuing our wedding themed day, we decided to work on the arch. When we left off last time, we had one side mostly done:


Well, tonight we finished it, and its twin:


Of course, the second one went much quicker, since we had all the measurements already in place. Pretty exciting, since now all we have left is the top.

As we've already discussed, Matt spent a good amount of time making 6 very perfect notches in three boards. Now these boards are going to make up the main horizontal pieces at the top and we wanted to do something fancy to the edges. I did some sketching, and here's what we came up with:

Which looks lovely, right? A nice gentle curve, add some flair. But then we realized (well Matt realized) that after the experience cutting the notches, cutting a curve might be more than we bargained for time and effort wise.We did explore quite a few cutting options, including a jigsaw, a coping saw, a handsaw and even this dremel saw (which it turns out only cuts 1/4 inch deep)


So, we talked about it over dinner, and I think we might just turn that curve into a 45 degree angle. In the end, I think it will look just as nice and we won't have to invest in a band saw to complete our project.

In other news, I got to try out my wedding hairstyle friday night and it looks lovely. I'm pretty excited :)


Wednesday, February 13, 2013

In which we attach 6 boards

We're still working on the arch and today we started adding the slats for the lattice to one of the sides. Now, we want the sides to be level and square and all that good stuff when we are done and what we found after just making the frame was that we weren't quite true. So, we decided to use the lattice to shore things up. We left a little wiggle room in the 2x4 / 4x4 frame and laid it one side down on the ground


Then we used shingles to prop it until it was perfectly level. Next came a big choice, how to form the lattice? We tested out a lot of different shapes and finally decided that the traditional even squares was, well, a little too square for us. So we decided to go with a more modern offset pattern


The angle of the photo makes it a little hard to tell, but the slats are in fact farther apart as they get closer to the bottom. Matt and I had to break out our algebra skills to get it done (holy 7th grade flashback, batman!)

You can see here where we did our calculations:

in case that is hard to see, here's what we have:

1x+2x+3x+4x+5x+6x=69

solve for x and you get 3.28 inches. multiply by two and add, you get 9.84, by 3 and add and you get 19.68, etcs and you have the distances for all the boards. It took a while, but I think it looks pretty cool. Tomorrow, we'll add the vertical pieces, making it look something like this:


Tuesday, February 12, 2013

Archie and the Turtle Cat

Matt and I are getting married in less than a month! And we've gotten a lot done. Met with the wedding planner for the great hall to finalize plans, bought shirts for the groomsman (and ties!). I've got my dress and my shoes and the flowers, cake and DJ are pretty much set. But we are still working on a couple things, one of them being the arch.

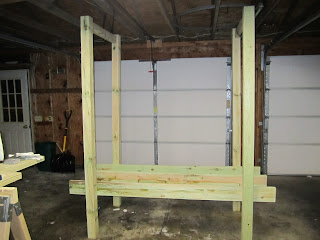
We already got the lumber (you did good, van) and the other night, we started working. First we put the sides together. Lucky for us, we have good friends with compound miter saws (cough, cough Mark)

You can see Matt here sporting his lovely new coveralls, courtesy of Wally world.


As for the height, width, length, we had a pretty good idea but James was kinda enough to come out and stand with me, and then Matt, so we could get an idea of how it would look. We ended up at 5.5 ft wide, 7.5 ft tall, and 3 ft deep.


The next night, we started working on the top. Now, the design needs to be at least sort of modular, since we have to get it into the Great hall for the wedding. Since that is the case, the designed called for us to make notches in the top beams, so the top would fit nicely down over the beams across the top. Enter Matt the Perfectionist.

Now, the drive to do things right is one of the reasons I love Matt. But, after about an hour in the garage watching him work on one notch, I sort of hit my limit and went in to clean. Matt however, did not appear until 4 hours later. In his defense, he made 6 of the most perfect notches ever. Really, the are pretty much perfect. You can see 3 of the 4 beams we need are done (they will go on the top, not the bottom as shown below, but he wanted to see if they fit)

And boy, are the level. Seriously, doesn't get much better


And, in leroy news, he's becoming a turtle. A sleepy, cardboarded-shell turtle. It's a good thing we didn't get an actual star, that probably would have hurt more :)


Saturday, February 2, 2013

backsplash progress

Tonight, I finally got around to prepping the backsplash. Been thinking about it for a long time, but tonight, I finally put mud to wall and got cracking. Of course, first I had to protect our very special butcher block with some aluminum foil and paper, and move everything out of the corners and off the counter.


 It took a couple hours, and a good bit of mud, but I finally worked my way all the way around the kitchen. Not having done this before, I'm not totally sure if I did it right, but there is tile scheduled to go up over it, so it doesn't really have to be pretty, just holeless and smooth.


Tomorrow, we'll go back and sand it down. Make it all smooth and pretty-like.

While I was doing that, Matt did some work on the Subaru, which is leaking anti-freeze, shoveled the drive (we got another 3-5 last night), and did some more vacuuming up in the basement.