Thursday, April 25, 2013

Bye bye rafters, hello drywall!

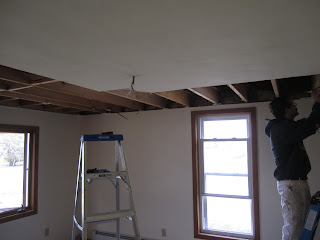
Last night Mark and Joe came over and we say goodbye to the lovely wooden supports in our master bedroom in favor of the more conventional drywalled look.

First step was to put drywall glue on the rafters


Then, the first sheet went up the screws went in and Matt took a stab at cutting out the pot light. Turns out, the Dremel has a definite "hand" and its not left (unlike Matt who is a lefty). After we figured that out, Mark became the go-to light cutter, and he did an awesome job.


The next two sheets went up really quick and before we knew it we had half the room done. Notice the specially formulated blue board which is made to withstand moisture better than the regular stuff. Hopefully we won't have another leaky toilet, but if we do, we are now prepared.


Then came some planning and scheming to figure out how to do the other half of the room. See the room is mostly square, but it has a little jut out near the door because of the closet and old fireplace. We ended up deciding to mimic what we did on the other side of the room so all the seams would line up. We also had to deal with the ceiling fan, but, Mark to the rescue again. we did some very careful measuring, cut a small hole and just fed the wires through (after cutting the breaker, of course, I've learned my lesson). And just look at that cut out job (Mark again)


That last corner piece did give the boys some trouble (it was getting late and that kind of spacial reasoning is difficult under any circumstances) but they got it done and it looks amazing!


Thanks also to Cori for making an amazing dinner that I got to eat piping hot and the boys got to eat a couple hours later. (Their work ethic is way better than mine, clearly).

Next up, mud all the screws, the seams, the corners and sand it smooth so we can paint.

Tuesday, April 23, 2013

prep work

Over the past few days we've made some progress on the prep work needed before we put up the drywall on the ceiling in our master bedroom.

Remember that old rusty pipe? Well Matt sanded it down and spray painted it with a Rustoleum product that prevents rust. He also painted the boards around it with Kilz, just in case there was any lingering mold from the water that leaked in from the bathroom.


We also added some supports to the copper pipes that run across the room (as it was suggested we do by inspector Mike when he came to look at the electrical)


Over the weekend, we also did a couple other little things. Like finally hang the paper towel rack


Put the corner back on the house (after only, oh, um, the entire winter). Don't worry, that nail we put in has a rubber washer, so its water tight.


and do a little more shoring up of the garage roof. We've gotten a lot (A LOT) of rain lately and are still working on getting it completely water-tight. Getting closer and closer though


Tomorrow night, we start on the drywall!

Thursday, April 18, 2013

We have lights!

I need a uber-exclamation mark. the regular one just doesn't cut it. That's right, tonight Matt and I connected up the rest of the wiring for the lights.

First we put the wires back in the box and the covers on. Dimmer is on the left and the switch for the fan is on the right (since we haven't bought the fan yet, that will have to wait for a later post)


Then we strung the wire into the box and connected up the new box. We left some wire in case we ever need to move the boxes around. Its easy to make wire shorter, pretty much impossible to make it longer... (also, Matt wanted me to let everyone know that he did tack up the wire after this picture was taken, so it is to code)


Then, we gave it a test run. Here's dim:


And here's full strength


It is super awesome. You tap twice to turn on full strength, once to go to the level of dim it was when you turned it off. Each location can dim the light up or down using the little tabs on the side and it fades to off when you tap once with the light already on. I can't wait till we drywall it all back up and get to move back in. I might just stand there and turn them on and dim and off for a while.

Monday, April 15, 2013

Sunday Funday

Then, on Sunday we continued the fun by working on the ceiling fan. The old one was put in using a strong, but definitely not to code 2 x 6 instead of a box like it should have been. You can see Matt's enthusiasm when we discovered it


Matt and James made a valient attempt to put it up the new box Sat night, but trying to think through a job like this at 1 am is pretty difficult. You see, the floor joists aren't level and the fan box we had wasn't level, but the book we have says you should try to level the box. Makes you scratch your head, right? Yeah, us too. So we went to home depot and bought a new box that we thought would be easier to level. And it wasn't too bad during the light of day.


The only issue was that to get it level, we had to get a little creative. The post comes with helpful tabs that sit on the bottom of the joists, but since our joists weren't level we had to bend one back and then cut off the excess that hung down below the beam


Then, we finished up wiring the switches; one for the fan and a dimmer for the lights by the door to the closet


And the same set up by the door into the room


And, as a bonus, we picked a paint color. It's blue grey and after looking at it on the wall we're not sure if its too blue. So we're going to grab a couple other colors and do some more test patches


As an added bonus, I got to cap off the silly switch outside the room


In a few short days, you'll be able to turn on the lights without opening the door, amazing :)


Snowballs in April

Well, I'd like to say that the title of this post is just a play on words, but it did actually snow yesterday. So I"m going to use my typical form of dealing with the Wisconsin winters that just won't end - denial - and write this post like that little white blip on the radar never happened. Ready? Here we go...

No, I'm not talking about the weather, I'm talking about our little bedroom project that's turned into a LARGE bedroom project. Not without good reason. I mean, when you already have a 4 x 8 hole in the ceiling, you might as well have a plumber out to look at it (no worries, all is well with the old plumbing). And, since the room is only about 14 x 8 ft anyway, and has no lights and the only switch for the current fan is outside the room, you might as well just rip out all the drywall, put in lights and move the switch, right? Yep, that's what we though too.

So we moved everything out (our living room now  looks like a furniture refugee camp):


And went to work taking down the rest of the drywall


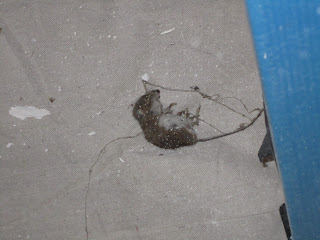
We even found a little friend


Don't worry, he was very old and very dead. RIP little guy.

Then, we had to clean up all the debris.


Shake out the tarps and lay them again so Mark could come over to help us run some wire

We went up through the floor by the closet door (Leroy checked it out, all looks well)


And then put in 5 can lights around the room


While the boys were doing that, (big shout out to Mark for making it possible) I decided to make some progress on the bathroom.

First I got rid of the ugly, plastic magazine rack that we never use


And then I set my sights on the frilly curtain and the plastic "leaded glass" window tint.


And put up some much nicer rice paper


It didn't go to bad, but there are still a few bubbles I couldn't get rid of. Since Matt and I are planning on replacing the window anyway, I just decided to let it go even though the (mostly buried) perfectionist in me wanted to keep redoing it.

Then, in my zeal to keep going while the boys were still running wire, I did something a little silly. I decided I would take the front of the heater off and just take a look and see what was behind it. You know, that way I could clean the grate and maybe even give it a facelift with some heat resistant paint we bought. What I didn't realize was that the grate was actually attached to the entire heating unit. And since I didn't think that was the case, I didn't trip the breaker before trying to pull it off. You can guess where this is going... I dropped the unit, severed a wire, sparks flew and I tripped a breaker. 

On the upside, that heater was a serious fire hazard, check out what was behind that grate


 See all that brown fuzz? Yeah, that's burnt dust, years and years of it. Oh, and instead of insulation around the box, whoever installed it used, that's right, cloth. Can you say flammable?


Wheew, and that was just what we did Sat. Next up, Sunday funday!

Tuesday, April 9, 2013

Speaking of unexpected projects

Oh, we weren't speaking of unexpected projects? Well, our house didn't know that. In fact, our house, in its infinite wisdom, decided that not only did we not have enough to do, but that we needed some excitement in our lives.

Here's the skinny: I woke up yesterday and got in shower, like I do. I resurfaced to Matt running around looking just a little flustered. Turns out the upstairs toilet had decided to flood on him and the shutoff valve was rusted shut, which meant, that's right, water all over our floor. Conveniently  the previous owners thought that carpet was a good decorating decision for a bathroom, so clean up was a little interesting. It involved a lot of paper towels, a large fan, and tearing up said carpet.

Crisis averted, Matt and I go into the bedroom to dress for work. Matt says "Whats that noise" and I said, "It's raining, must be the rain on the windowpane". You can guess where this is going. That's right, water dripping through the ceiling onto our bed! Luckily, we bought a mattress protector when we bought the mattress, so none of the water actually got through to the mattress, but all our sheets were soaked and pandemonium ensued (hence the lack of photos).

So, when we came home, we had our work cut out for us. We didn't want to leave the ceiling all wet, so we pulled everything out of the room and did some demo:


There was an old, shabbily done seam, and since that's where the water came through, that's where we started.


And then we kept going till we got here.


We did find some buried treasure in the form of a past inspection sticker.


And the old pipes are pretty cool, if a little rusty (we are going to have a plumber come by to check them out. I mean, now's the time, right?)


Then, we realized that it had also dripped down some into the closet, so we took that off too


And here's where we finished.


On the bright side, we can fix the bad seaming job, and, as a bonus round, since the ceiling is all torn up we are going to look into putting a light switch in the room (as opposed to what we have now, which is one, and only one, switch in the family room that controls the fan). Both projects we were going to do, just not projects were were planning to do now